TOPMed Aligner, or, How to Import Data From Gen3 into Terra and Run a Workflow on It
Powered by Terra, Gen3, and Dockstore
Overview
This document is an open access preview of the Terra tutorial workspace that you can find here.
In this tutorial, you will be running the TOPMed alignment workflow as you learn how to use BDC-Terra, BDC Powered by Dockstore (BDC-Dockstore), and BDC-Gen3. This beginner-oriented tutorial walks you through how each of these platforms interact with one another.
The workflow in this tutorial is the TOPMed aligner. This workflow is a containerized version of the pipeline University of Michigan developed to process all CRAM files available in the TOPMed program. You can use this aligner workflow to prepare data for comparison with TOPMed CRAM files.
Data Models Covered in this Tutorial
One aim of this tutorial is to help you learn the Gen3 data model for TOPMed and how to interact with it. This can help you bring your own data to the BDC platform and compare it with the TOPMed data that is currently hosted in this system.
You will learn how to import TOPMed data from Gen3, which uses a more complex graph-based data model than the data model used for what's already hosted on Terra, such as Terra's version of the 1000 Genomes. However, in order to use TOPMed data from Gen3, you must be approved to use TOPMed data via dbGaP. If you do not have dbGaP access, do not worry -- you will still be able to run this workflow on 1000 Genomes Data, as long as you have an NIH credential such as eRA Commons that can get you into Gen3.
Cost Estimate
Your costs may vary depending on how your data is formatted and what parameters you use. In addition, if you are using preemptibles, there is some element of randomness here -- a preemptible may or may not be stopped by Google at any given time, causing an in-progress task to need to restart.
When running the aligner workflow on 10 full-size CRAMs from the PharmaHD study imported from Gen3, using the aligner's default settings, the cost was $80.38 as reported by Terra. The most expensive of those ten files cost $10.82 and the least expensive cost $5.74.
Setting Up
Because Gen3 hosts controlled-access data, you will need to set up your Terra account for the linkage to Gen3 to work properly. Please see Terra's documentation on the subject.
If you are planning to work with controlled access data, you should set up an Authorization Domain to protect your work. This will prevent you from inadvertently sharing data that shouldn't be shared. Learn more in this article.
Using Gen3
If you are new to using Gen3 and Terra, you may want some background information. A good overview can be found in Understanding and Using Gen3 Data in Terra, which will introduce you to the Gen3 data model and how it is stored in Terra. Those seeking more specific information may want to use the following resources:
Head on over to Gen3 and log in by clicking "Profile" in the top right hand corner. You will need to log in using your NIH eRA Commons ID. When you click on "Exploration" you will see all subjects and studies you have access to. Use filters on the right hand side of the screen to select what you are interested in.
Selecting by study/project
If you are interested in a particular study, click the "subject" tab on the leftmost toolbar. You will see a dropdown menu to select by project ID. In this example, we will search by Project ID for "1000 Genomes".

Importing to Terra
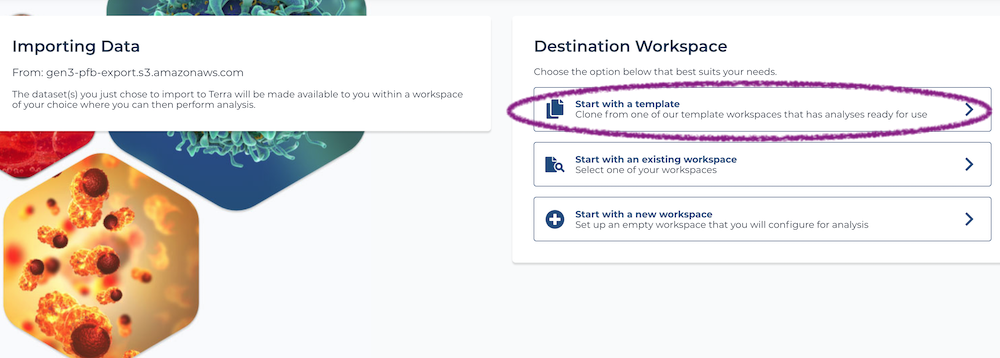
After selecting a project, click the red "Export To Terra" button. Bear in mind that exporting may take a few minutes and you shouldn't navigate away from the page while this is happening. Once it completes, you will be taken to a Terra page where you can choose which workspace to put your data into. From here, you should select "template workspace" and import into the TOPMed aligner workspace.

What happens next? A copy of this exact workspace will be created, with several data table that hold administrative, and any clinical and biospecimen data associated with the project. Biospecimen data tables will hold DRS that point to the location of the genomic data hosted by NHLBI. You can learn more about DRS here. It will take a few minutes for the data to fully import, but once it does, you'll see the workspace has been populated with several data tables.
One of the data tables you'll see is called "Submitted Aligned Reads." If you scroll across that in Terra's UI, you will see a column named "data_format," indicating that these are CRAM files. But where are those files actually? Keep scrolling and you will see "pfb:object_id" as a column header, and under that, several drs:// URIs. This is what Terra will be using to locate the files. Thankfully, you don't need to remember these URIs. When running a workflow, if we want to run a WDL on this data, we can reference that pfb:object_id column in order to enter dozens (hundreds, even) of URIs into a workflow with just a few clicks.
Running the Aligner
The links at the top of this section should serve as an explanation as to how Gen3 data is stored. But even with that background, it may still look a little odd when imported into Terra, so let's walk through how to use these tables. If you want a more complete explanation of how these tables relate to each other, see the optional section towards the end of this workspace.
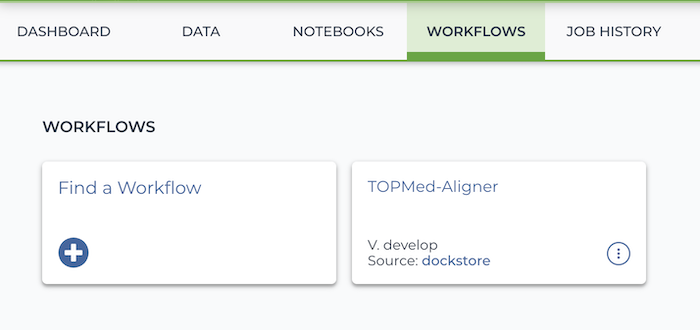
Select this workspace's Workflows tab. You will see a WDL has already been imported from Dockstore: a Dockerized version of the University of Michigan's aligner for TOPMed data. Select it.

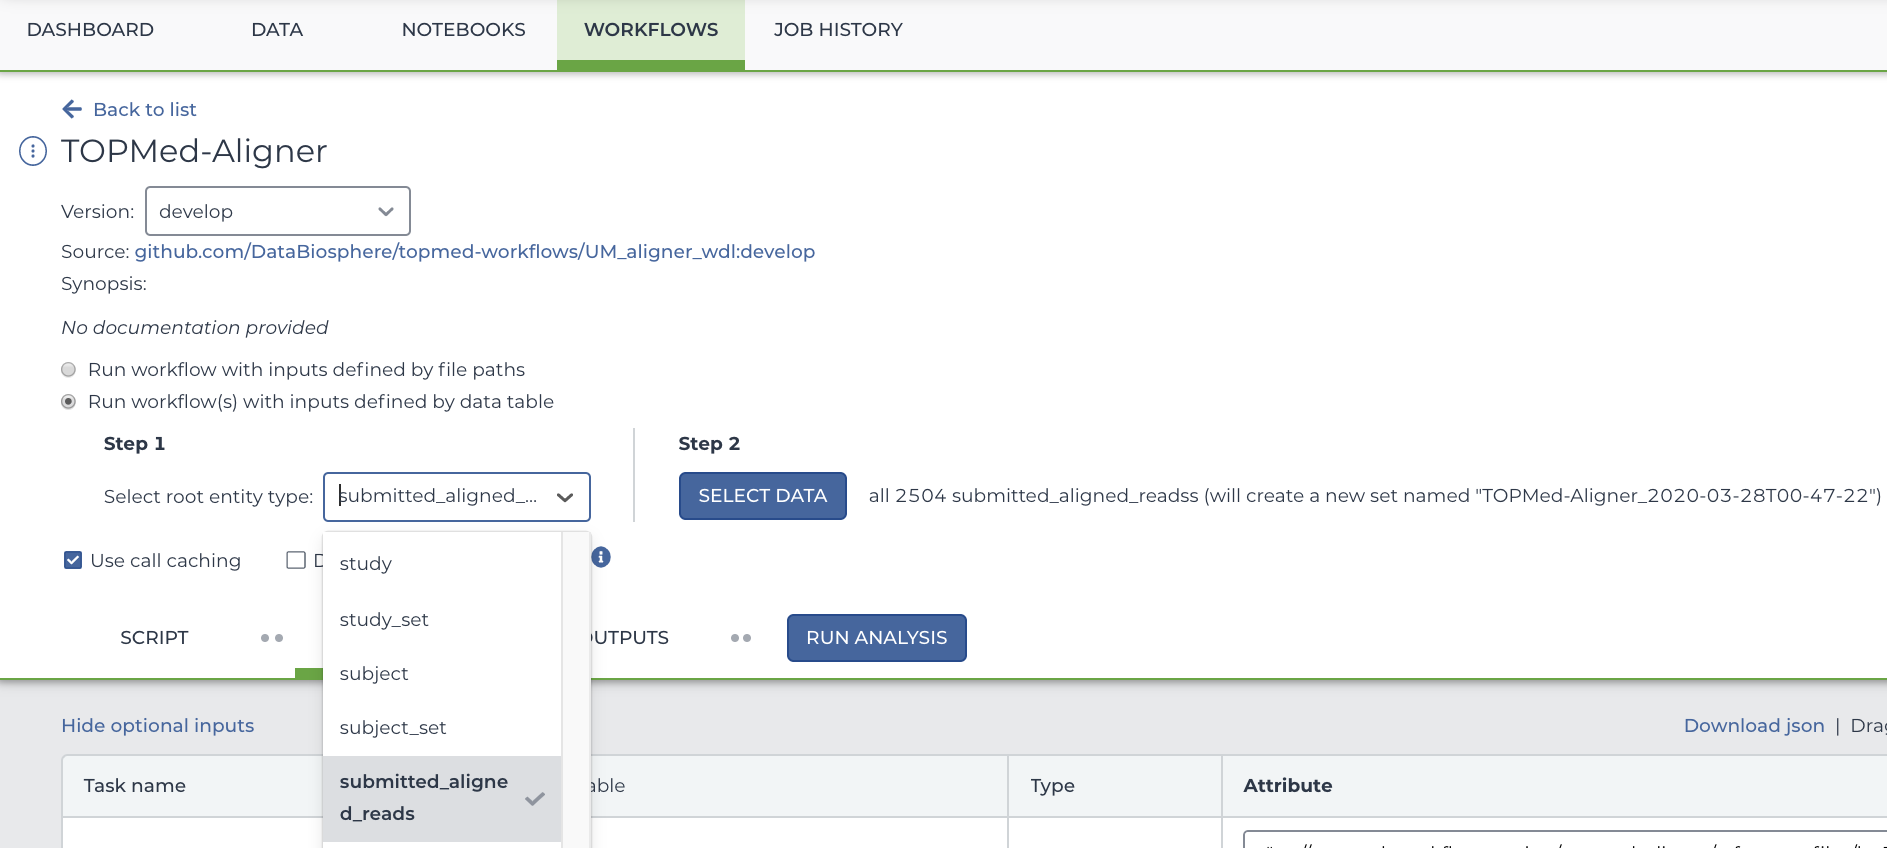
You will see two buttons. Select the bubble labeled "Run workflow(s) with inputs defined by data table", and in the drop down menu, select "Submitted Aligned Reads".
To select only particular participants, click "Select Data" which is located to the right of the Step 2 heading. This will open a new menu where you can select precisely which rows you want to run your workflow on. In this case, each row represents a participant.

Below this, you will see several arguments that can be used for this workflow. If it's not already filled out, type out this.pfb:object_id as the input_cram_file.
But what is "this"? In Terra, we can use "this" to represent the data table that we selected from the drop down menu. So, in this case, "this" refers to the Submitted Aligned Reads data table. As for ".pfb:object_id", that part means that Terra is looking at the column called "pfb:object_id" in said data table.
For more information on using workflow inputs on Terra, please see Terra's documentation on setting inputs.
To Preempt or Not to Preempt?
If you already know what preemptibles are and don't want to use them, you can skip this section, as this template workspace is set up to avoid them by default.
When computing on Google Cloud, you have the option of using preemptible virtual machines. These virtual machines work essentially the same as what you expect from Google Cloud, but they are significantly cheaper (sometimes less than half the price!). There is a catch, however -- they may shut down in the middle of a task and only exist for 24 hours at most. You can find more information from Google, but let's talk about the specifics of this workspace.
This isn't a concern if you were running on small test CRAM files such as the ones on the aligner's Dockstore sample JSON. But when running on full-size CRAM files such as ones imported from Gen3, there is a chance that any given step (pre-alignment, alignment, or post-alignment) might get shut down before it completes if it's run on a preemptible VM. This is especially true of the post-align step, which tends to take the longest, often more than 24 hours when running on full-sized CRAM files.
We've broken down some possibilities here so you can balance risk, run time, and cost:
Setting
Max # of Tries On Preemptible VM
Max # of Non-Preemptible Tries
Total Max Tries
PostAlign_preemptible_tries = 0 and PostAlign_max_retries = 1
0
1
1
PostAlign_preemptible_tries = 3 and PostAlign_max_retries = 3
3
3
6
You don't set PostAlign_preemptible_tries nor PostAlign_max_retries, ie, default values are used
0
3
3
Whenever preemptible_tries is a positive integer, the task will exhaust all preemptible tries before trying on the more expensive non-preemptible VM. The same logic applies for PreAlign_preemptible_tries and PreAlign_max_retries, as well as Align_preemptible_tries and Align_max_retries. Terra handles all this on its own; you don't have to manually restart any of these tasks as long as the workflow itself is still running.
Once you have decided if you want to change the default behavior for preemptible VMs, press "save" and run your workflow.
Tracking the Aligner's Progress
With your workflow now running, click on the "JOB HISTORY" tab at the top of this workspace. You will see a table detailing every submission you have made in your workspace.
Let's click on the top row, which shows the most recently submitted workflow. You will see something like this -- metadata on the top, and below that, a one-row table. If you click on "view" in the leftmost tab of the table (marked with a square below), you will more information about the workflow, including how long it's running certain tasks. In this case, that means pre-alignment, alignment, and post-alignment. This can come in handy of a workflow fails, as this screen will tell you how long each task has run for, how many attempts it had, and (if applicable) any logs created in the process. You can also click "workflow ID" in the leftmost column (circled) to be taken to Google Cloud's own website to explore the bucket, although you can do the same on Terra itself.
Take note of the submission ID and workflow ID, or at least the first few digits of each. They'll come in handy in a moment.

Examining Output
As the aligner does its thing, it will begin writing files to the Google Cloud bucket your workspace is hosted on. You can find this in the "Files" section of your workspace's DATA tab. Note that this "Files" section will be the lefthand side below all of the data tables you imported from Gen3, so you'll probably have to scroll a bit to see it.
Remember that workflow ID we took note of earlier? That workflow ID is also the name of the folder that your workflow is writing to. Keep in mind every time you run a workflow, a new folder will be created, even if you are just running the same workflow on the same data with the same parameters. In your workspace's file system, your output data for the aligner will be stored in Files/{submission ID}/TopMedAligner/{workflow ID}/call-PostAlign/. So, for instance, in the screenshot above my submission ID started with "b17b9937-ff17-46e8-b20b-798dc3d4ebf2" and my workflow ID started with "2368abf3-0e2a-4cd7-b10a-89d4d1f9002d." So my output files are located in Files / b17b9937-ff17-46e8-b20b-798dc3d4ebf2 / TopMedAligner / 2368abf3-0e2a-4cd7-b10a-89d4d1f9002d / call-PostAlign /. Of course, these files will only be created once the aligner finishes -- if your workflow is running but hasn't finished yet, the call-PostAlign folder might not exist yet.
Running on More Than One Data Table
This is optional to run the aligner included in this workspace, however, certain other workflows may require you to draw upon more than one table, so this is good information to learn.
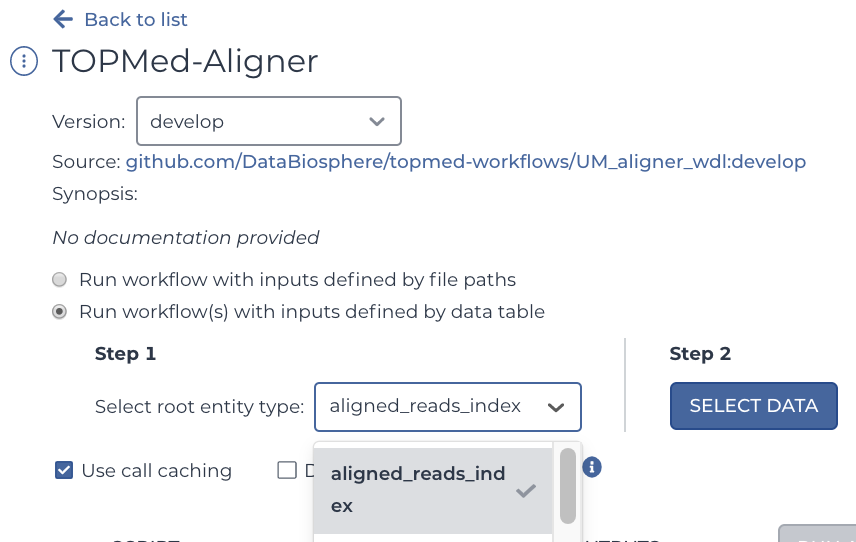
Go back to the workflow tabs and again select the aligner. However, this time, select "Aligned Reads Index" instead of "Submitted Aligned Reads". Yes, this is a table of CRAI files, not CRAM files -- but like the CRAM table, it too links to its files using DRS URIs in the pfb:object_id column. Don't worry, we'll get back to the CRAMs in a moment.

Like what was indicated in the section detailing Gen3's data structure, your input will depend on what table you select. In our case, we selected Aligned Reads Index. So that means that now anything that says "this" for an input will be looking at the Aligned Reads Index table.
In this version of the TOPMed aligner, CRAI files optional, but for the sake of learning more about Gen3's data structure we will be using them. In Gen3's data structure, CRAI files are considered a child of CRAM files, or in other words, "submitted aligned reads" table (which includes the CRAM files and their metadata) is the parent of "aligned reads index" table (the CRAI files and their metadata). When dealing with Gen3 data, children know their parents, but not vice versa. In summary, the table containing CRAI files also links to the table that contains CRAM files, but not vice versa. In this particular example, that link is stored in the CRAI table as a column named submitted_aligned_reads. Note that it does not link to the table overall, but rather a given row of that table: Each row on the CRAI table points to the row of the CRAM table that its associated with. This can be a bit confusing to wrap your head around, so feel free to click through your data tables on Terra or review Gen3's documentation if you're getting a headache at this point.
Why does this matter? Because you can use this to effectively use two different data tables in your analysis, even though at first glance it looks like you can only select one in the drop down menu. You simply enter that table's link to the CRAI files, ie, this.pfb:object_id as the input for input_crai_file. (You will have to scroll to find input_crai_file in the aligner as Terra puts optional arguments below all required arguments.) And for input_cram_file, the correct entry is this.submitted_aligned_reads.pfb:object_id. Handy, isn't it?
Final Notes
We have now gone over how to set up the TOPMed alignment workflow to work with the Gen3 graph-model. Below are some final notes if you want to align your data from other sources using this workflow.
How to run WDLs from Dockstore -- useful if you want to preform further analysis on your newly aligned data
If Your Data Was or Will Be Aligned to Something that Isn't HG38
Something that may be easy to miss in the aligner's documentation is the following note:
The CRAM to be realigned may have been aligned with a different reference genome than what will be used in the alignment step. The pre-align step must use the reference genome that the CRAM was originally aligned with to convert the CRAM to a SAM.
There are two important things to take away from this:
If what you already aligned your data to (remember, CRAM/SAM/BAM files are already aligned) does not match the reference genome you are aligning to with this workflow, you must include what you aligned them to as the argument for
PreAlign_reference_genomeand its associated index as the argument forPreAlign_reference_genome_index. For instance, if your CRAM files were generated using HG19 as your reference and you are using this workflow to align them HG38, you must set HG38 as your argument forref_fastaand HG19 asPreAlign_reference_genome.TOPMed data is aligned to HG38. If you are running this workflow to compare your own data to TOPMed data, you must align to HG38.
Authors
Workspace author: Ash O'Farrell WDL script and bug fixing: Walt Shands Dockerized TopMED Aligner: Jonathon LeFaive Edits and bug-squashing: Michael Baumann, Beth Sheets
This workspace was completed under the BDC project.
Workspace Changelog
Date
Change
Author
Feb 4, 2020
initial draft
Ash
Feb 6, 2020
updated dashboard text
Beth
Feb 10, 2020
gen3, job tracking, output, major revisions
Ash
Mar 27, 2020
major reorganization, removal of unneeded info, better data structure explanation
Ash
Oct 28, 2020
updated to reflect pfb prefix of Geb3 tables + minor edits
Ash, Beth
Dec 7, 2020
added cost estimate
Ash
Last updated
Was this helpful?
